OMG todays project is maybe one of my favorites ever. Ever since the launch of the Cricut Maker last summer I have had so many ideas floating around in my head that I wanted to make a reality. One of them was my Personalized Finger Puppets and I just LOVE the way they turned out. It's no secret that I'm a die hard Cricut fan. (See all the proof here), with the Maker and it's adaptive tool system, the possibilities of creativity really are endless! The performance and versatility really are unmatched.
Growing up my brother and I had our own stick horses. We loved chasing each other around on them and, on occasion used them as weapons haha. Well my best friends daughter has been loving horses lately (thanks to the Spirit Riding Free on Netflix) and I had the idea to attempt to create a stick horse of my own for her and I LOVE the way they turned out!
Supplies
Post Contains Affiliate Links
If you buy the cool stuff I recommend, you still pay the same price, but I get a small commission. Everybody wins!
Cricut Maker
Cricut Cutting Mats (You'll want a standard grip as well as a fabric mat)
Cricut EasyPress (Or Iron)
Cricut EasyPress Mat
Cricut Cutting Mats (You'll want a standard grip as well as a fabric mat)
Cricut EasyPress (Or Iron)
Cricut EasyPress Mat
Cricut Iron On (I used black, black glitter, white and white glitter)
Cricut Designer Fabric (I used Sweet Prairie)
Wooden Dowel (I used 1/2 inch)
E600 Glue (not pictured)
Sewing Clips (not pictured)
Batting (not pictured)
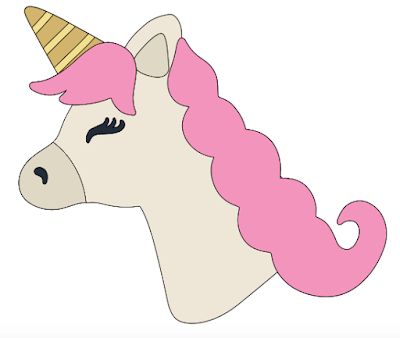
I started by designing the file in Cricut Design Space. Did you know the Design Space software is available for iOS, Android, Windows, AND Mac?! You really can use it anywhere! Especially with the machines bluetooth wireless technology! The original Design Space image is actually a unicorn (one of the "Three Unicorns" from the Unicorn Squad cartridge) but I really wanted to do a traditional stick horse so I modified it to be a horse, you could totally leave it a unicorn for a more magical look though! Here is what it looked like before:
And with a few little modifications, voila, it's a cute horse!
The project is good to go if you want to make your own, all you have to do is click "Make It"! It's always easiest to change the colors to the materials you'll be using on the canvas screen to make loading the mats easy.
Once you're in the mat preview screen, take a look at all of your mats. Don't forget to mirror any mats that will be any form of Iron On. Because for this project you will be cutting two of everything, facing two different ways, you technically don't have to mirror, but it's a good habit to get into. You can see from this picture where you can select the mirror option (the green toggle switch).
This is also where I usually play around with the mats to minimize my iron on waste by moving all of my cuts appropriately on the mats, that is totally optional though, just me and my OCD haha. Also, be sure in between mats to double check your settings and be sure that you have selected the right material for each mat, especially if you are using glitter and lite iron on, and be sure to use Fast Mode where you can for up to 2x faster cutting and writing!
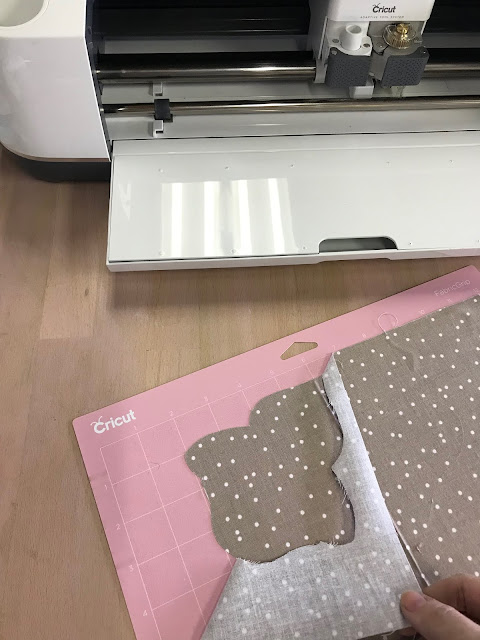
With all Iron On, you're going to want to put it face down on your cutting mat so your machine can do what is called a "kiss cut" where it cuts the vinyl but leaves the carrier sheet in tact.
Technically with your fabric you also want to put it face down on your fabric grip cutting mat but again since there will be two cut out, I placed it face up and was fine.
Watching the rotary blade work never gets old. And those cuts... perfection! The rotary blade makes cutting virtually any fabric without backing possible like it never was before!
Once all of your mats are cut, weed all of your iron on and start separating the front pieces from the back.
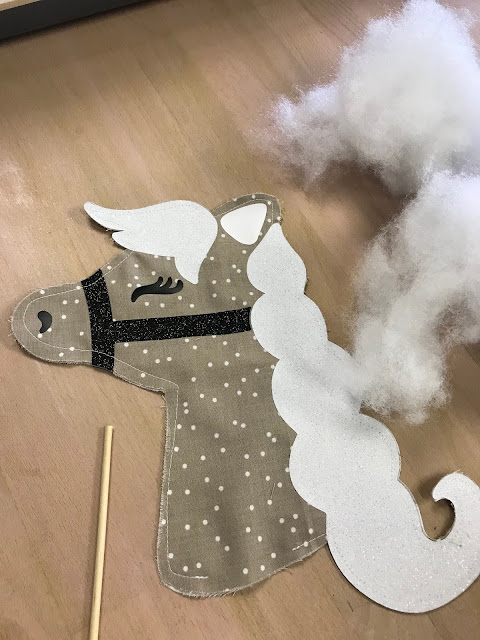
Then, using your EasyPress (or iron) begin to apply your iron on. Because they are always updating it, be sure to reference the EasyPress recommended settings before getting started. You'll want to put the glitter iron on down first because it requires the most amount of heat. I did the mane and bridle in glitter, so those went on first.
And then I applied the standard iron on, the eyes, nose and ears.
Repeat on the other side. A couple of tips while working with your iron on:
-Be careful that your carrier sheets don't end up under any of your vinyl
- Always be sure to cover all iron on either with a carrier sheet or protective barrier of some kind so that it doesn't come in contact with the heat source.
Then it's time to sew! Using sewing clips (or pins), clip your two pieces together and sew! Be sure to leave a small opening at the bottom to add batting and the dowel.
Once you are finished sewing, begin stuffing your horse with batting, be sure to get it all the little corners too. I used a small wooden dowel to help, but your fingers work just fine also.
Keep adding batting until you are happy with it.
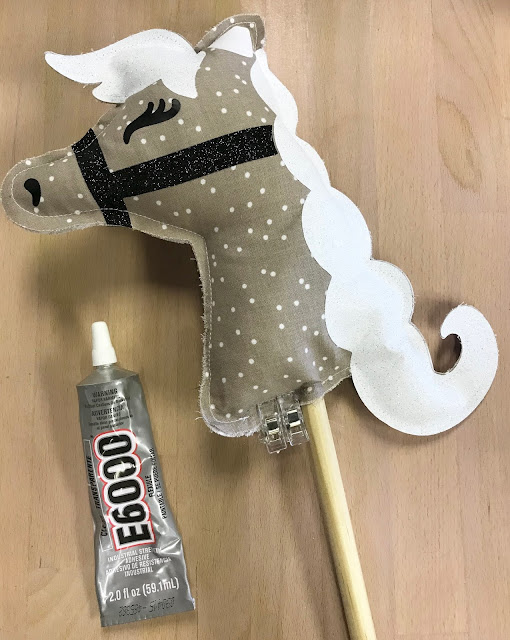
Then place your dowel inside, it may take a little wiggling but you'll want to me sure it goes all the way through, to give the head stability. Once you've got it through, seal the opening using E6000 glue. Once you are finished, add sewing clips and let it dry.
Let the glue dry for several hours.
Removing the clips may be a little difficult depending on how much glue you used but you should be able to get them off with a little muscle.
And that's it! The Maker really does all the hard work for you, all you need are the materials and some basic sewing skills and you can make a DIY Stick Horse of your own!


27 comments:
Hey here. I normally do not love checking site articles because I feel that they are bad standard. Nevertheless, this 1 was value reading because it presents worthwhile and analyzed details.
Hey everyone! I am Greg and I love your web-page and especially this content. I want to know something additional. Can I prepare to you a private message, please?
Hi. I am Meg. Now I am your frequent viewer. I'm happy of your techniques – in reality, I'm satisfied of you that you create so awesome writing and I could read them. Well done!
My mum forced me to be to read the blog. I said it was different site for dummies but I immediately discovered that I ended up being improper. It is a awesome site with exceptional content.
It can be Maria here. I honestly have to think that the topic of the article is very interesting. I am truly take pleasure in it! Fantastic job!
Hi there. I am very delighted that you have printed the articles. I have waited for it for years. I'm your ordinary user and I am happy that I will read about the problem at your blog.
Hey here. I'm Michell and i am intrigued about the blog. I'm completely freak and I like studying it every day. I do not bored. I simply like it. Thanks a lot!
Several many weeks earlier a coworker of my parent informed me about the site. I didn't have occasion to examine it and nowadays I'm upset that I have not understand it day-by-day – I have so a lot to make up for.
Hey there. I'm Andy and I'm available to state thanks a lot for the texts written. I am just really pleased that a person did it for us and another individuals.
Hi there. I have to tell you that you have done a ideal duty. Well-done! The material are actually highest quality.
Good early morning folks! I'm right here to notify you that the post affirms actually facts. The creator was pushed to create many duty to perform every small stuff promptly successfully!
Hey. I commonly don't like reading blog writing because I think that they are poor standard. Nevertheless, this one was worth reading because it presents worthwhile and examined facts.
Hey everyone! I'm Greg and I enjoy your web page and particularly this content. I desire to see something additional. Can I make to you a professional message, plz?
Hey. I am Meg. I'm your average viewer. I'm pleased of your abilities – actually, I'm proud of you that you submit so ideal posts and I could browse them. Well done!
My mommy made me to witness the website. I imagined it was another site for dummies but I fast found out that I ended up to be improper. It can be a awesome website with good information.
It quite is Maria right here. I seriously have to state that the issue of the post is very appealing. I'm actually love it! Great job!
Hi there. I am extremely joyful that you have posted the words. I have waited for it for a long time. I am your ordinary reader and I am pleased that I will look over about the problem at your site.
Hey here. I'm Andy and I'm fascinated about that site. I am completely freak and I fancy browsing it everyday. I never bored. I simply love it. Thanks a lot!
Three many weeks ago a colleague of my father advised me about the website. I failed to own energy to have a see at it and now I'm angry that I haven't understand it day by day – I have so a lot to make up for.
Hey there. I'm Andy and I am present to declare thanks for the messages written. I am completely thankful that a person did it for us and another people.
Hi there. I need to admit that you have finished a excellent job. Well-done! The posts are actually maximum standard.
Good morning everybody! I'm here to determine you that the article claims really reality. The creator was required to complete many duty to perform every small thing on time effectively!
Hey around. I in most cases cannot enjoy browsing website content because I think that they are weak quality. However, that one was worth reading because it provides interesting and verified information.
Hi here everybody! I'm Greg and I enjoy your website and specifically that post. I want to discover something additional. Can I create to you a private message, kindly?
Hello. I'm Meg. I am your ordinary visitor. I am satisfied of your abilities – in reality, I'm proud of you that you publish so ideal articles and I can browse them. Well done!
My mommy forced me to be to notice the blog. I believed it was different site for dummies but I promptly learn that I ended up to be mistaken. It is a great site with great content.
Thanks for sharing some Cricut design tips. Cricut machine is designed for people, who love crafting. You can make different designs with different shapes.
Post a Comment